
This guide describes how to enable two‑factor authentication (2FA) for signing in to your Servermall Cloud account. 2FA significantly strengthens the protection of your account, making unauthorized access difficult even if the login and the password are compromised.
Prerequisites
- You must have an account on Servermall Cloud. For how to register an account, see the guide: “Creating an Account”.
- You must have a mobile phone running Android or Apple with a camera to install an authenticator application.
- You must download and install on your mobile phone one of the two applications for generating two‑factor authentication codes:
- Two‑factor authentication must be disabled on your account. For how to disable two‑factor authentication, see the guide: “Disabling 2FA on Your Account”.
Enabling 2FA
- Sign in to the Servermall Cloud control panel. For how to sign in, see the guide: “Signing in to the Control Panel”.
- Click the avatar or the profile name in the upper‑right corner of the Servermall Cloud control panel. A drop‑down menu with available actions will open.
- In the drop‑down menu, select “Security Settings”.

The “Security Settings” page will open.
- Go to the “Two‑Factor Authentication” tab.
- Click “Click Here to Enable”.

The “Enable Two‑Factor Authentication” window will open. - Click “Get started >>”.

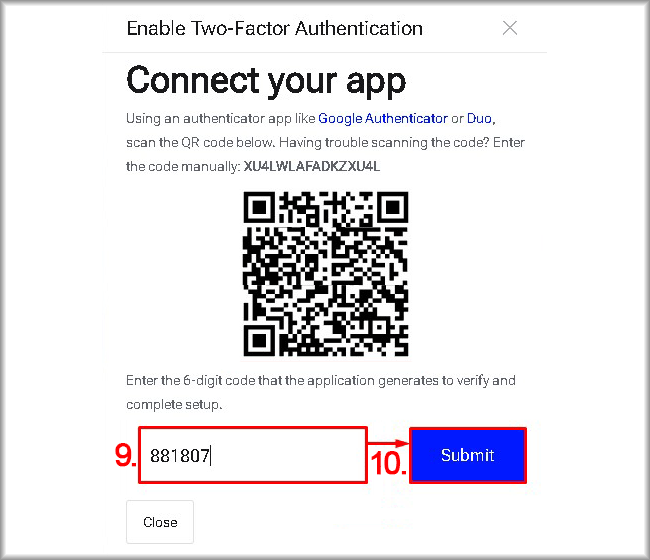
The “Enable Two‑Factor Authentication. Connect your app” window will open. A QR code for linking the 2FA application will be displayed.
- On your mobile phone, open the authenticator application: Google Authenticator or Duo Mobile.
- Add your Servermall Cloud account to your authenticator application:
- Adding an account in Google Authenticator:
- Tap “Add a code” in the mobile application.

You will be redirected to “Set up your first account”. - Tap “Scan a QR code” in the mobile application.

A QR‑code scanning window will open.
If you have problems scanning the QR code:
Make sure the 2FA mobile application has permission to use the camera. If necessary, grant this permission in the device settings.
If the camera is not available:
Enter the required data manually by tapping “Enter a setup key” instead of “Scan a QR code”. This will redirect you to “Enter account details”. In “Account name”, enter the email address linked to your Servermall Cloud account. In “Your key”, enter the alphanumeric code shown above the QR code on the “Connect your app” page, then tap “Add” and go to step IV. - Point the camera of your mobile phone at the QR code shown in the “Connect your app” window of the Servermall Cloud control panel.

The QR code will be recognized automatically, the “Authentication code saved” message will appear, and you will be taken to the list of authentication codes. - Remember or write down the authentication code and return to the “Connect your app” page of the Servermall Cloud control panel.

- Tap “Add a code” in the mobile application.
- Adding an account in Google Authenticator:
- Adding an account in Duo Mobile:
- Tap “Set up account”.

You will be redirected to “Link your account”. - Tap “Use a QR‑code”. A QR‑code scanning window will open.

A QR‑code scanning window will open.
If you have problems scanning the QR code:
Make sure the 2FA mobile application has permission to use the camera. A QR‑code scanning window will open.
If the camera is not available:
Enter the required data manually by tapping “Use activation code” instead of “Use a QR‑code”. This will redirect you to “Add account”. Scroll down this page and tap “Add other account”, then tap “Use activation code” again. In the “Activation code” field of the opened window, enter the alphanumeric code shown above the QR code on the “Connect your app” page, then tap “Next”. After that, in the opened window, in “Name account”, enter the email address linked to your Servermall Cloud account, tap “Save”, and go to step VI. - Point the camera of your mobile phone at the QR code shown in the “Connect your app” window of the Servermall Cloud control panel.

The QR code will be recognized automatically, and you will be redirected to “Name Account”. - Tap “Save”.

Your account will be linked, and you will be redirected to the list of your 2FA accounts. - Tap “Show” to display the 6‑digit authentication code.

The code and its expiration time will appear on the screen. - Remember or write down the authentication code and return to the “Connect your app” page of the Servermall Cloud control panel.
- Tap “Set up account”.
- Enter the authentication code received in the previous step from the authenticator application into the “Enter authentication code” field in the “Connect your app” window of the Servermall Cloud control panel.
- Click “Submit”.
Your account will be linked to the two‑factor authentication application, and the “Enable Two‑Factor Authentication. Backup Code” window will open.
If, after clicking “Submit”, you see the message: “The code you entered did not match what was expected. Please re‑scan or enter the code and try again”, this means that your code has expired. Return to the authenticator application, copy a new 6‑digit code, and go to step 8 of this guide.
- Save or write down the code from the “Your Backup Code” field in a safe place, separate from the login and the password. This code will be needed if the two‑factor authentication application or the device it runs on becomes unavailable. In this case, you will be able to provide the code to support, and 2FA for your account will be disabled.
- Click “Close”.

Two‑factor authentication for your Servermall Cloud account is now enabled.